Purpose
The following blog posts will be a companion guide to Steve and Adam’s Intune training videos found at Intune.Training (this covers Episode 3) and will help you get the Windows Store for Business (WSfB, also known as Microsoft Store for Business) setup in your environment. This guide assumes that you already have followed Part 1 of this series and already have a working deployment profile. By the end of this guide you will have access to the Company Portal app and other apps of your choosing. This has been a major request from several people in the WinAdmins community. I strongly recommend joining if you are not already a member!
Why?
Why do you need the WSfB? You need the WSfB in order to deploy the company portal app which is required in order to make other applications available for install. Please bear in mind if all you’re going to do is deploy REQUIRED applications then you do not have to setup the Store for Business. However in this day and age we want our users to have a choice on what they want to install on demand and this integration allows us to make applications AVAILABLE for install.
Enabling Windows Store for Business
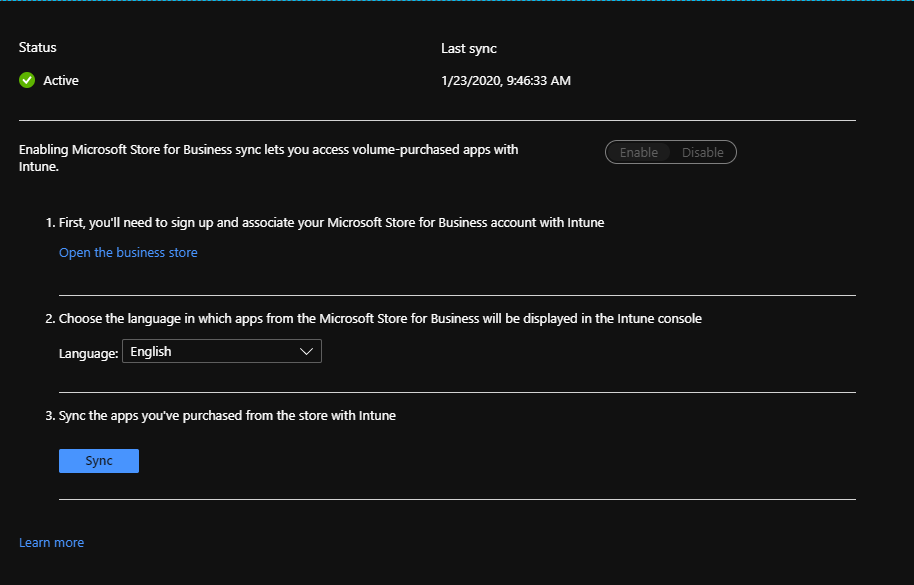
Navigate to theMEM admin center and login with your azure credentials if prompted.
- Select Tenant Administration on the left hand side
- Select Connectors and tokens
- The Microsoft Store for Business should be up by default
- Slide the slider to Enable
- Select Open the business store
- You will be brought to Business Store
- Select Sign in in the upper right hand corner
- Select Manage at the top
- Select Settings on the left
- Select Distribute
- Scroll down to the Tool selection and select Active on the Microsoft Intune tool
- On the same page you can change the Private Store name if desired (You will not be able to do this until you have completed step 14)
- Click on Private store at the top (If you renamed your private store it will be that display name)
- A new page will load stating you need to activate the Store for Business, you can activate it by ticking the check box and hitting activate
- Navigate back to the Connectors and tokens tab
- Select your Language
- Select Save
- Hit Sync
- It should look similar to the image below
What about the actual applications?
Now that we have a working WSfB connector lets add some applications! Please note the WSfB will periodically sync and grab the latest versions of the applications you’ve added. The manual sync button will force a sync. I’ll walk you through getting the Company Portal app and PowerBI Desktop.
- Navigate to the Business Store tab
- Select Shop for my group
- On the right hand side in the Search the store type in Company Portal
- Select Company Portal from the list of available apps

- Select Get the app
- A prompt will appear letting you know the app has been purchased and added to your inventory
- In the search bar type in PowerBI
- Select the PowerBI Desktop app
- Select Get the app
- Navigate back to the Connectors and tokens page
- Select Sync
Congrats you now have apps in your tenant!

Okay, so now I have some applications but how do I deploy them?
Navigating back to the MEM admin center you will see Apps listed on the left hand side. I’m going to walk you through getting those apps we just added deployed to users as well as some options.
- Select Apps on the left hand side
- Select Windows
- Select Company Portal (Online)
- Select Assignments
- Select Add group
- Change the assignment type to Required
- Select the desired group
- Select OK
- Hit Save
- Go back to Apps on the left hand side
- Select Windows
- Select Power BI Desktop (Online)
- Select Assignments
- Select Add group
- Change the assignment type to Available for enrolled devices
- Select the desired group
- Select OK
- Hit Save
Well that was pretty easy wasn’t it? Now that we have the company portal deployed as Required every user in the group we selected will get the application. You’ll notice for Power BI we only set it as Available for enrolled devices. In order to install this, a user would open the Company Portal app we deployed and under the Apps section they will see all the available apps, which at this point is most likely only Power BI Desktop. From this menu they can install the app.
BONUS SECTION - Deploying the newest version of Edge
Who doesn’t love a little extra icing on the cake? In this section I’ll walk you through how to deploy the latest stable version of Edge. I highly recommend it! Please bear in mind this will replace the existing Microsoft Edge, and by replace I mean it will do a bunch of fancy redirects in the background.
- Navigate to MEM admin center
- Select Apps on the left hand side
- Select Windows
- Select Add
- The App type will be Windows 10 (preview) Located under Microsoft Edge, version 77 and later
- Click App information
- Give the app a name and description

- Select OK
- Click App settings
- Change the Channel to Stable
- Select OK
- Select Add
- Navigate to the application
- Select Assignments
- Select add a group
- Select your assignment type (Required in my case)
- Select Include Groups
- Select the group or turn the sliders for All users and devices to YES
With that set you now have the new Edge! As always if you have questions or concerns please head over to the [WinAdmins][2] discord. The next post will go over Configuration Profiles and potentially PowerShell scripts!

Jake Shackelford Admin/Contributor
Jake is one of our Admins but also our inaugural author and the main reason SysManSquad exists today.